247CTF - Networking Challenges - Error Reporting Protocol
Problem Statement
Can you identify the flag hidden within the error messages of this ICMP traffic?
Tools Used
- Wireshark 3.4.3
- Python 3.9.1
Description
This is a downloadable challenge. When you click the 'Download Challenge' button, you obtain a ZIP archive file. The ZIP archive contains a packet capture (pcap) file. The file's name was error_reporting.pcap in my case, it may differ for other users. To solve this challenge, you would need to decode and assemble the data from multiple ICMP packets (my file contained the data from 1712 packets). Wireshark can be used to open the packet capture file and visualise the various layers and fields in the packets. Once you open the packet capture file with Wireshark, your window should resemble the screenshot below.
As shown above, the first packet is an Echo (ping) request and the rest of the packets are Echo (ping) replies. Double-clicking a packet would open it in a new window. You can go ahead and double-click the first packet. Expand Internet Control Message Protocol and select the Data field as shown below.
As shown above, the Data field contains 14 bytes which decode to
the ASCII string Send the flag!
. It is likely
that this packet is of little relevance since it doesn't contain the flag. Now,
you can similarly double-click the second packet to open it in a new window.
As shown above, the Data field is of 48 bytes and contains the string
JFIF
(highlighted in green). This is a hint that the data is
in the
JPEG File Interchange Format (JFIF) and is from a JPEG (.jpg) image file. To confirm this theory, you can look at
the first four bytes of the data field. They contain the hexadecimal value
ffd8ffe0 (highlighted in yellow). These bytes along with the JFIF
string are known as magic bytes and are used as a basic test for determining
whether some data corresponds to a JPEG image file. If you
examine the rest of the packets, you would see that all of them have a data field of 48
bytes. Let us assume that all of the packets (except the first) together contain all the data
required to reassemble the image. You can export the decoded data from the
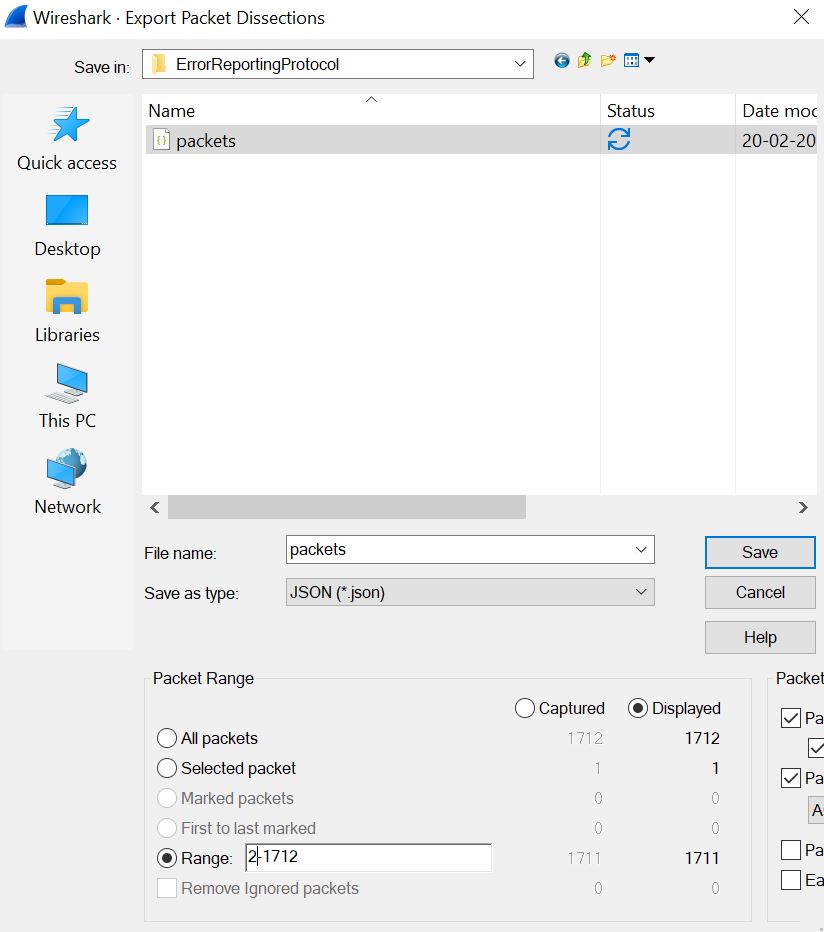
packet capture file to a format that's easier for a standard programming language to work with (I used JSON). To
export the data as JSON, click
File > Export Packet Dissections > As JSON... in the Wireshark
main window. Enter the range as 2-<Total Number of Packets> (the total
number of packets was 1712 in my case). Enter the file's name (packets.json) and click
Save.
The exported JSON would contain the Data field from the ICMP packets in the hexadecimal format (with individual bytes separated by a ':' character).
Now, you can use your preferred programming language to:
- Extract the value of the data field (hexadecimal string) from each packet in the exported JSON file.
- Parse the hexadecimal string into bytes.
- Write all the parsed bytes to an image file.
I used the Python 3 code below to achieve this.
#Extracts flag image data from Wireshark packets dissection exported in the JSON format
import json

def get_packet_data(packet):
    # Extracts the data field from a packet and parses them to bytes (binary) format

    #Parameters:
    #   packet (dict): A packet parsed into a dictionary by the json library

    #Returns:
    #   data_bytes (bytearray): A bytearray containing the bytes from the Data field in the ICMP packet

    data_str = packet['_source']['layers']['icmp']['data']['data.data']
    data_bytes = bytearray.fromhex(data_str.replace(':', ''))
    return data_bytes


if __name__ == '__main__':
    with open('packets.json', 'r') as packets_file:
        packets = json.load(packets_file)

    with open('flag.jpg', 'wb') as flag_image:
        for packet in packets:
            flag_image.write(get_packet_data(packet))
The code above assumes that the packets.json file is located in the current working directory. It uses the json library to parse packets.json to a nested dictionary. It then extracts the ICMP data field from each packet and parses the hexadecimal string into a bytearray (binary data). It then writes the binary data from all packets to an image file (flag.jpg). Once the Python script is executed, you would find a file flag.jpg in your current working directory which would contain the flag as shown below (I have redacted the flag, you would need to follow the steps above to obtain the flag).


Comments
Post a Comment